

Free Size Chart Module in PrestaShop
In this short tutorial I show how to get a size chart, size guide in PrestaShop without buying a module for tens of zloty or In this short tutorial I will show you how easily you can get a size chart, size guide in PrestaShop without buying a module for tens of zloty or euro. This method works when we do not need to add any attachments to a product other than images, and manufacturers supply the size chart precisely in the form of a graphic.
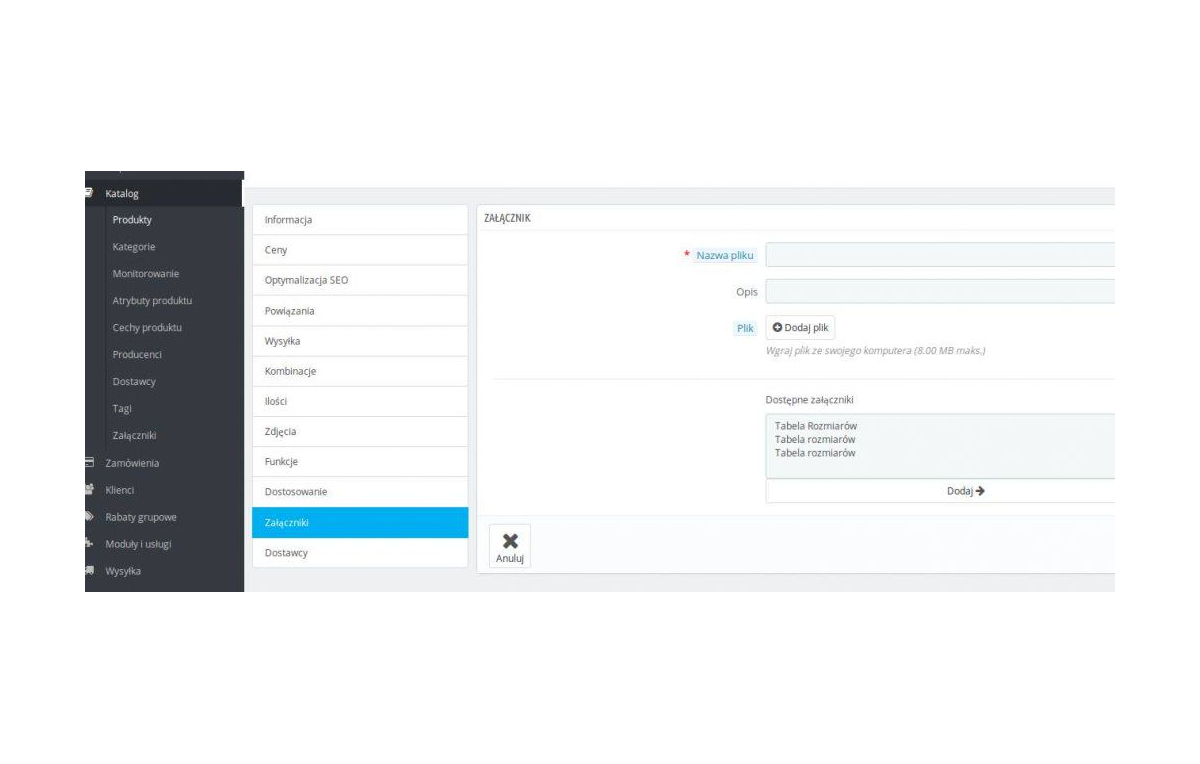
We go to the admin panel of our PrestaShop store, click Edit on any product, and then, as in the photo below, go to the Attachments tab.
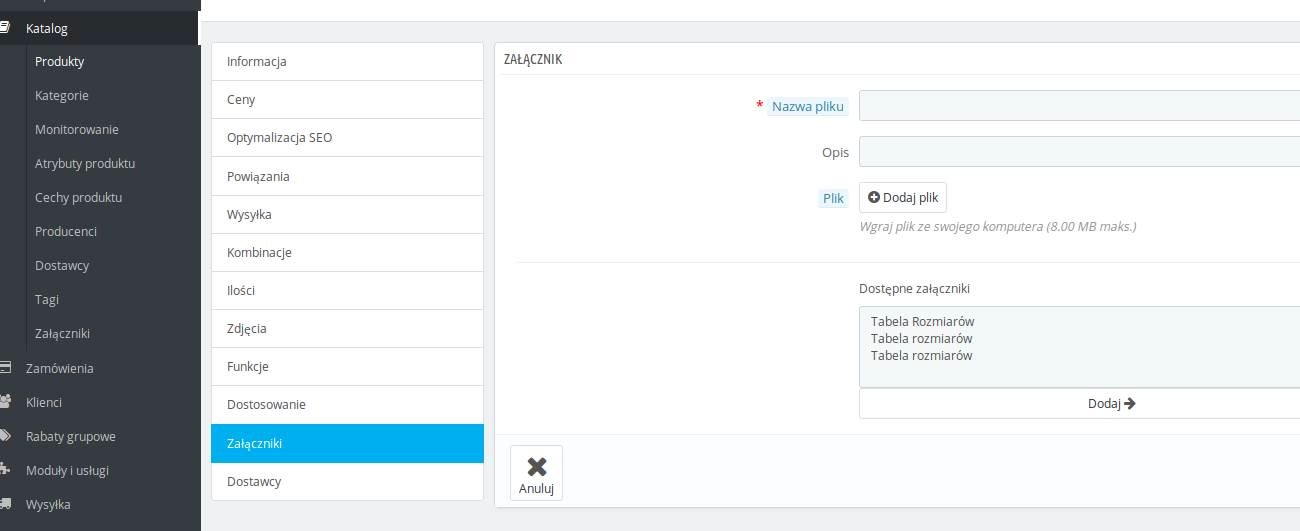 Next, add a file (we choose our size chart in .jpg, .gif or .png format and click upload). Then, from the available attachments window below, we select our size chart and click add, and then save.
Our size chart will now appear on the product page under the Download tab as a downloadable file.
We go to Localization -> Translations -> Translations of front-office pages -> we choose our theme -> we choose the language pl and click Modify.
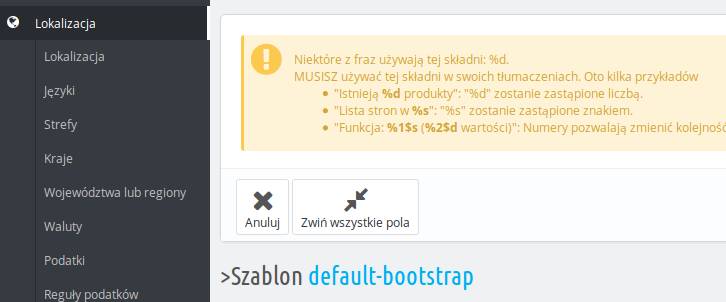
Now we have to find our Download in the translation. The quickest way is to click the expand button, as in the image below, use the keyboard shortcut ctrl+f and search for Download. When we find it, we replace that phrase with size guide or size chart.
Next, add a file (we choose our size chart in .jpg, .gif or .png format and click upload). Then, from the available attachments window below, we select our size chart and click add, and then save.
Our size chart will now appear on the product page under the Download tab as a downloadable file.
We go to Localization -> Translations -> Translations of front-office pages -> we choose our theme -> we choose the language pl and click Modify.
Now we have to find our Download in the translation. The quickest way is to click the expand button, as in the image below, use the keyboard shortcut ctrl+f and search for Download. When we find it, we replace that phrase with size guide or size chart.
 Once that is done, we go to our FTP server or localhost, depending on where our PrestaShop installation is. We go to the main directory -> themes -> our chosen theme -> sub -> product_info -> and edit the file tab.tpl
Around line 300 we look for this fragment of code:
<a class="btn btn-default btn-block" href="{$link->getPageLink('attachment', true, NULL, "id_attachment={$attachment.id_attachment}")|escape:'html':'UTF-8'}">
<i class="fa fa-download"></i>
and we replace it with
<img src="{$link->getPageLink('attachment', true, NULL, "id_attachment={$attachment.id_attachment}")|escape:'html':'UTF-8'}">
Or, in other words, we replace the code <a class="btn btn-default btn-block" href= with <img src=
Then, higher up in the file, we look for <div class="col-lg-4 col-md-4 col-xs-12"> and replace it with <div class="col-lg-12 col-md-4 col-xs-12"> (the first 4 to 12), so that our size guide / size chart is displayed across the whole Download tab (size guide).
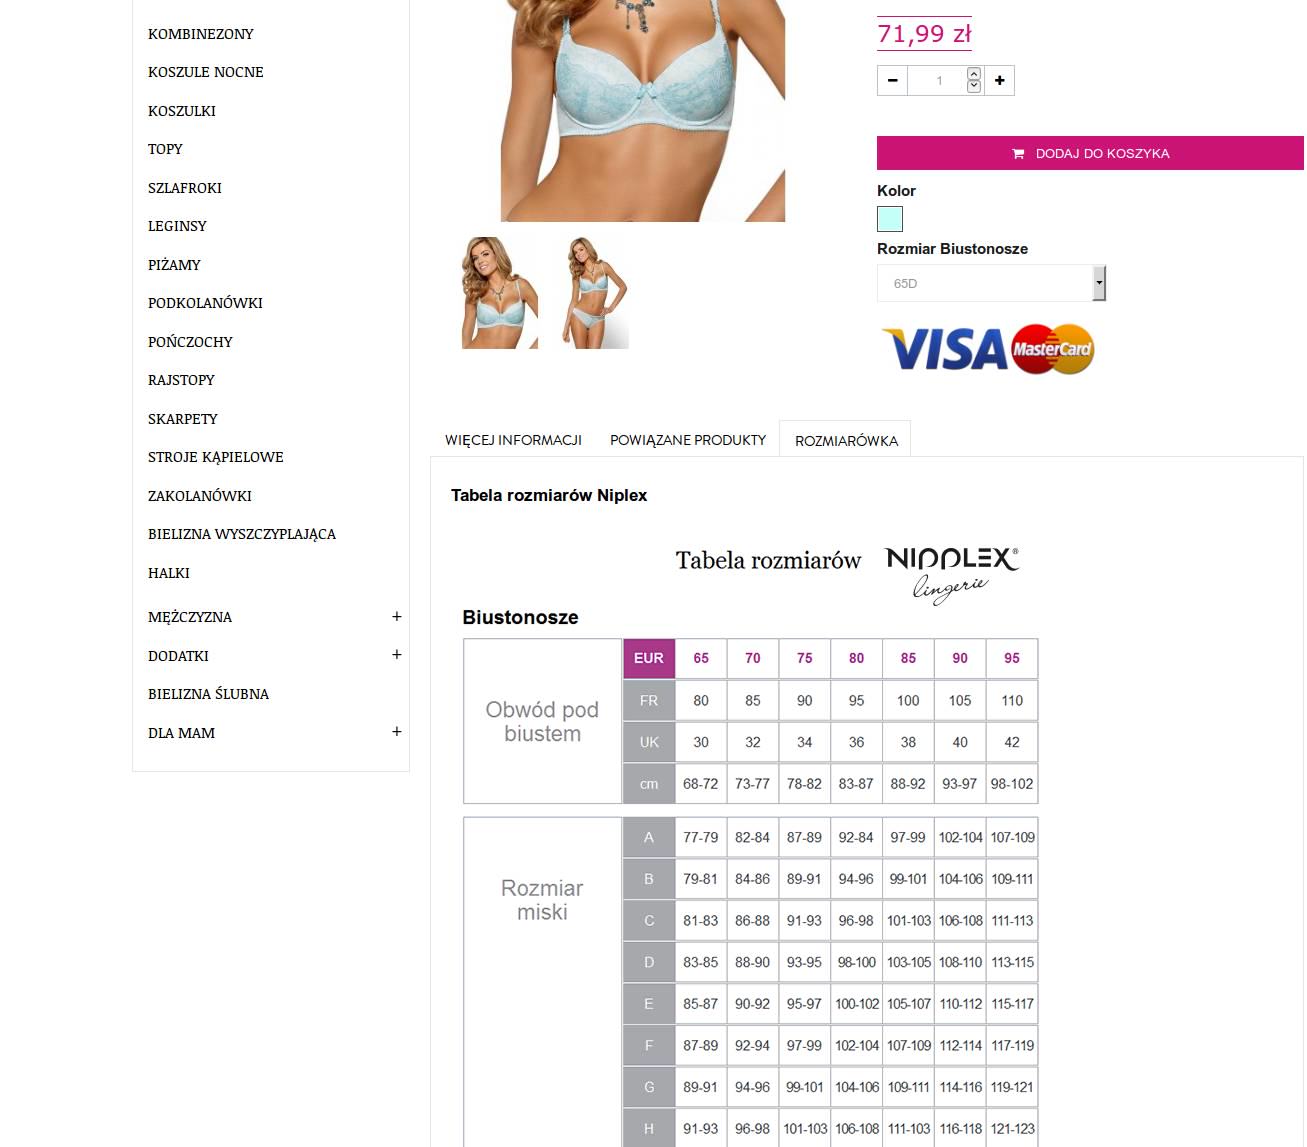
Below is a screenshot of the store showing how it looks:
Once that is done, we go to our FTP server or localhost, depending on where our PrestaShop installation is. We go to the main directory -> themes -> our chosen theme -> sub -> product_info -> and edit the file tab.tpl
Around line 300 we look for this fragment of code:
<a class="btn btn-default btn-block" href="{$link->getPageLink('attachment', true, NULL, "id_attachment={$attachment.id_attachment}")|escape:'html':'UTF-8'}">
<i class="fa fa-download"></i>
and we replace it with
<img src="{$link->getPageLink('attachment', true, NULL, "id_attachment={$attachment.id_attachment}")|escape:'html':'UTF-8'}">
Or, in other words, we replace the code <a class="btn btn-default btn-block" href= with <img src=
Then, higher up in the file, we look for <div class="col-lg-4 col-md-4 col-xs-12"> and replace it with <div class="col-lg-12 col-md-4 col-xs-12"> (the first 4 to 12), so that our size guide / size chart is displayed across the whole Download tab (size guide).
Below is a screenshot of the store showing how it looks:
Next, add a file (we choose our size chart in .jpg, .gif or .png format and click upload). Then, from the available attachments window below, we select our size chart and click add, and then save.
Our size chart will now appear on the product page under the Download tab as a downloadable file.
We go to Localization -> Translations -> Translations of front-office pages -> we choose our theme -> we choose the language pl and click Modify.
Now we have to find our Download in the translation. The quickest way is to click the expand button, as in the image below, use the keyboard shortcut ctrl+f and search for Download. When we find it, we replace that phrase with size guide or size chart.
Once that is done, we go to our FTP server or localhost, depending on where our PrestaShop installation is. We go to the main directory -> themes -> our chosen theme -> sub -> product_info -> and edit the file tab.tpl
Around line 300 we look for this fragment of code:
<a class="btn btn-default btn-block" href="{$link->getPageLink('attachment', true, NULL, "id_attachment={$attachment.id_attachment}")|escape:'html':'UTF-8'}">
<i class="fa fa-download"></i>
and we replace it with
<img src="{$link->getPageLink('attachment', true, NULL, "id_attachment={$attachment.id_attachment}")|escape:'html':'UTF-8'}">
Or, in other words, we replace the code <a class="btn btn-default btn-block" href= with <img src=
Then, higher up in the file, we look for <div class="col-lg-4 col-md-4 col-xs-12"> and replace it with <div class="col-lg-12 col-md-4 col-xs-12"> (the first 4 to 12), so that our size guide / size chart is displayed across the whole Download tab (size guide).
Below is a screenshot of the store showing how it looks:
Get notified about new articles
Subscribe by e-mail or turn on browser notifications — we only send new blog posts, nothing else.




Comments
No comment at this time!
Leave your comment